Most homeowners shopping for retractable patio screens in 2026 end up paying somewhere between $300 and $5,000 depending on whether they go manual or motorized, how big their patio door opening is, and whether they hire a pro. Manual retractable screens for a single standard patio door opening typically run $300 to $800 installed. Motorized systems on larger openings push into the $2,000 to $8,000+ range. If you just want a ballpark before you call anyone, those two numbers will tell you which category you're shopping in.
How Much Are Retractable Screens for Patio in 2026?

Owen Delaney
5 Jun 2026
Quick price ranges for retractable patio screens
Here's a straightforward breakdown of what to expect at each tier of the market in 2026. These are real-world installed prices, not manufacturer list prices, so they include basic labor for a standard single-opening job.
| Screen Type | Typical Installed Price Range | Best For |
|---|---|---|
| Manual retractable (single door) | $300 – $800 | Standard patio doors, budget-conscious buyers |
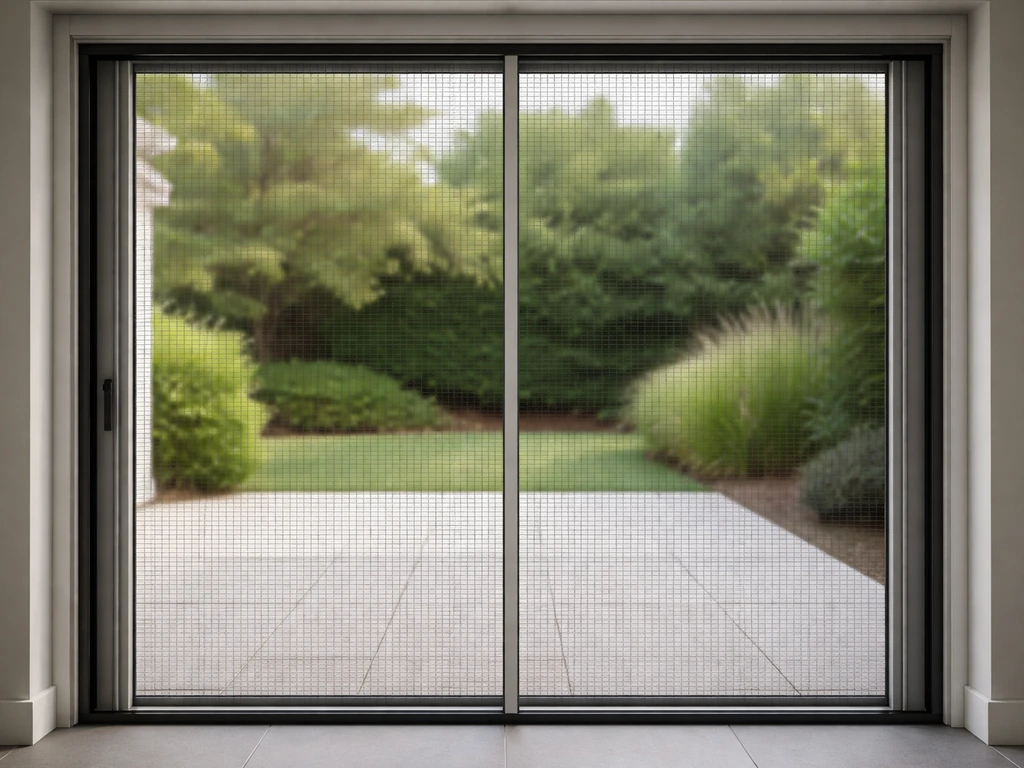
| Manual retractable (wide/double opening) | $600 – $1,500 | French patio doors, wider openings up to ~8 ft |
| Motorized retractable (single opening) | $1,500 – $3,500 | Convenience-focused buyers, frequent use |
| Motorized retractable (large/multi-opening) | $3,500 – $8,000+ | Large patios, wide sliders, outdoor living areas |
| Hardware/kit only (DIY, no labor) | $150 – $700 | Handy homeowners with compatible door frames |
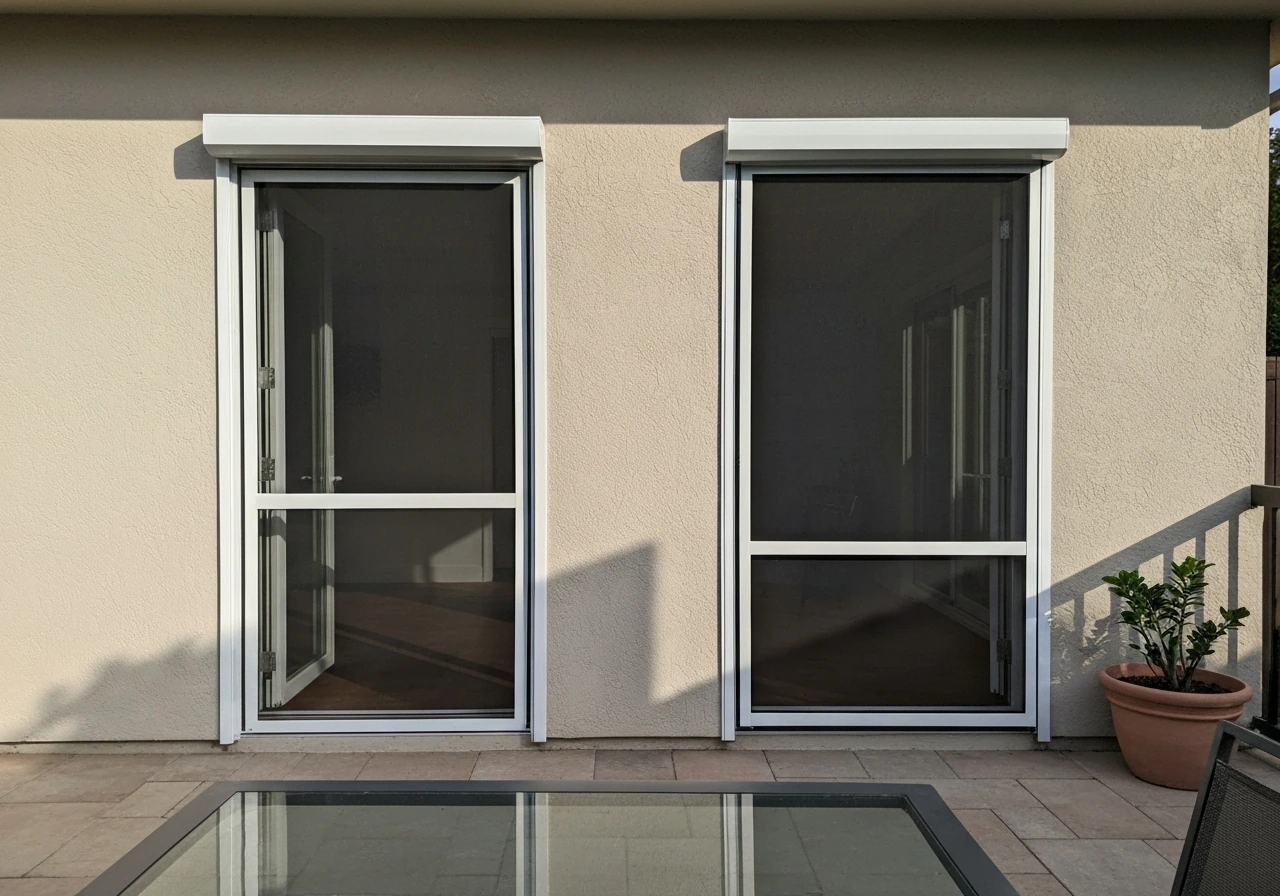
The $20 to $75+ per square foot figure you'll sometimes see quoted is more useful for larger motorized builds where screen square footage drives the quote. For a single patio door, think in per-opening terms instead. A 6-foot sliding patio door is about the most common scenario, and $300 to $800 installed is the realistic expectation for a manual system on that size.
Manual retractable screen cost breakdown
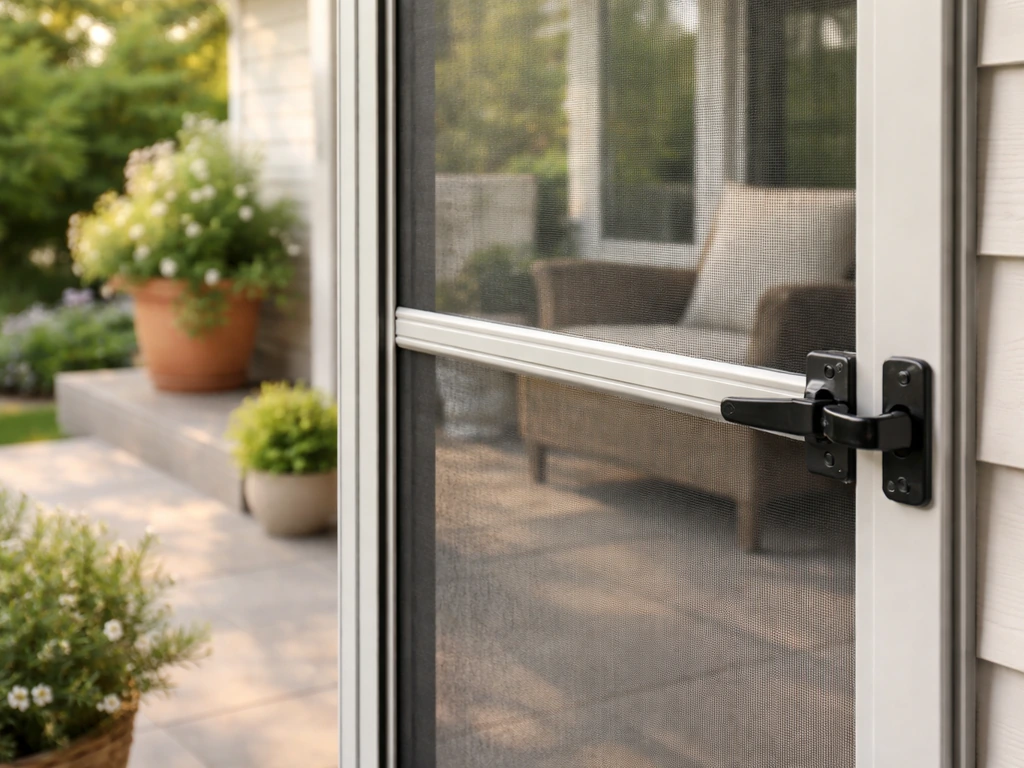
Manual retractable screens are the most common choice for single patio door setups, and they're often underestimated in terms of what's actually inside the unit. A quality manual system isn't just mesh on a spring. Take the Larson Brisa as an example: the kit includes a screen on a tube, a pre-tensioned spring assembly, and a speed reducer so the screen doesn't snap back and damage the mesh or the frame. That engineering is why even manual systems from reputable brands cost more than a basic fixed screen.
Here's roughly where the money goes on a typical manual retractable screen for a patio door:
- Screen housing and tube assembly: $80 – $250 depending on brand and frame material
- Mesh/fabric: $30 – $150 depending on weave density and material type
- Track system (sill, header, side channels): $40 – $120
- Hardware (latches, guides, tension components): $20 – $80
- Labor for installation: $100 – $300 for a standard single-door opening
Andersen's LuminAire is one of the more well-known manual retractable screen door systems for sliding patio doors. It comes with a 5-year limited warranty covering the screen housing, latch housing, screen track assembly, endcap, and sill adapter. That warranty coverage is worth factoring into your cost comparison because a cheaper unit with no warranty can end up costing more in the long run if the retraction mechanism fails after 18 months.
What actually changes the price
Four things move the needle more than anything else: opening size, mesh/fabric choice, frame material, and the track system quality. Manual versus motorized is the biggest single jump, but within the manual category those four factors still create a wide range.
Opening size
This is the most obvious driver. A standard 6-foot sliding patio door is the easiest and cheapest scenario. Step up to an 8-foot or 10-foot wide opening (common with French patio doors or wide sliders) and the price climbs because the screen housing gets longer, the track gets heavier, and labor time increases. Multi-panel openings, like a bifold or large multi-slide door, can require multiple screen units or a custom-width solution, pushing costs up significantly.
Mesh and fabric choice
Standard fiberglass insect mesh is the least expensive option and works fine for most homeowners just trying to keep bugs out. Solar screen fabric, which cuts glare and some heat gain, costs more but adds real value in hot climates. High-visibility mesh (sometimes called no-see-um or tight-weave mesh) is priced in the middle. If you want retractable bug screens specifically for a patio door, the mesh weave choice can add anywhere from $30 to over $100 to the unit cost.
Frame material
Aluminum frames are standard and handle most climates well. Powder-coated aluminum in custom colors adds to the cost, sometimes $50 to $150 more per opening, but it matters if you have a colored door frame and want a match. Some budget manual screen kits use lighter aluminum profiles that feel flimsy and tend to warp in high-heat or coastal environments. If you're in a humid or salty-air climate, spending a bit more on a heavier-gauge frame is worth it.
Track system quality
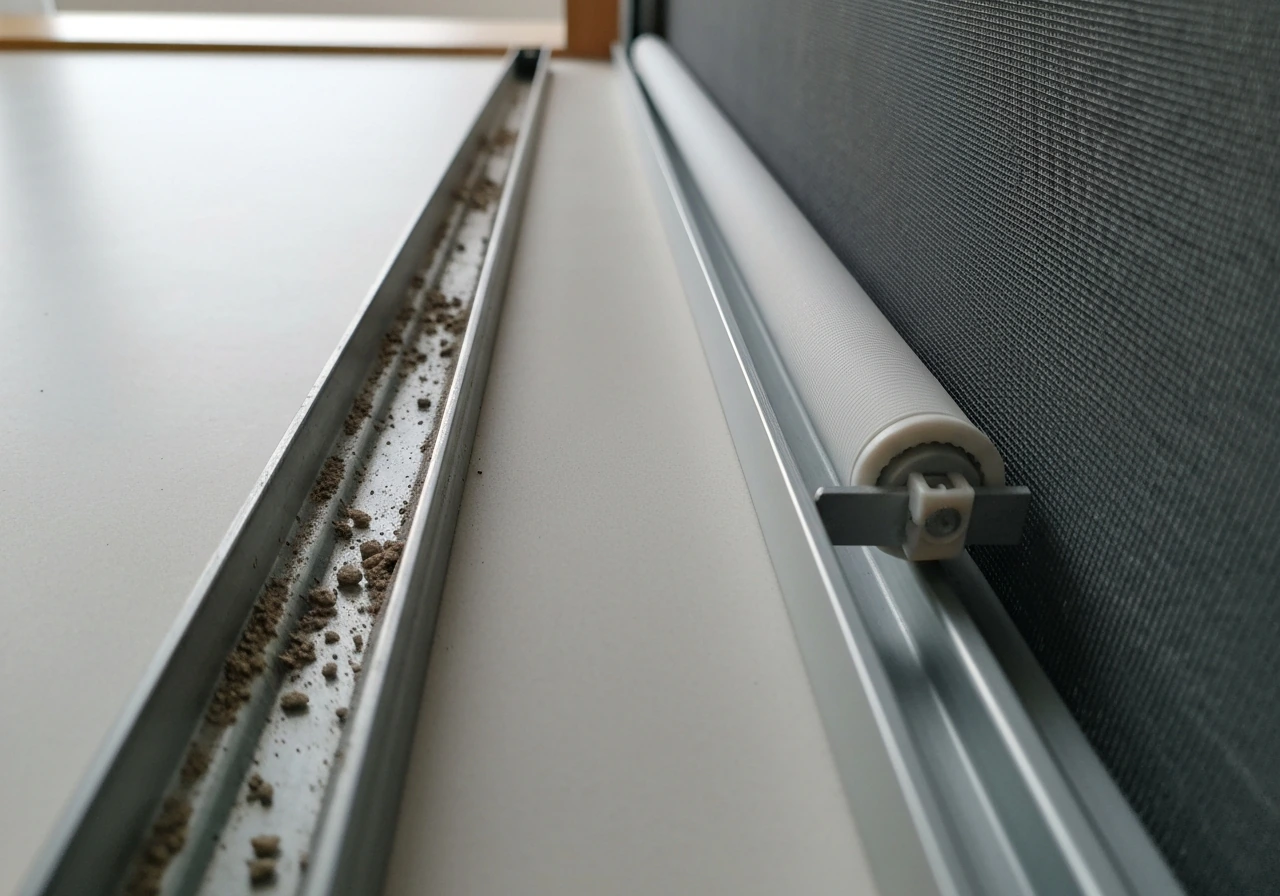
The track is where cheap manual retractable screens usually fail first. A low-quality sill track can bow or collect debris, causing the screen to jam or retract unevenly. Better track systems use tighter tolerances and smoother channels. If a contractor or brand skimps here to hit a lower price point, you'll notice it within a year or two of daily use. Ask specifically about the track design before committing to a quote.
DIY vs. professional installation: what it adds to the total
Labor typically runs $60 to $140 per hour in 2026 for screen installation work, and a straightforward single-door retractable screen install takes one to two hours for an experienced installer. That puts basic professional labor at $100 to $280 for a single opening in normal conditions. Complex retrofits, where the existing door frame needs modification or shimming to get the screen housing to sit flush and level, can push labor higher, especially if the framing is out of square.
For some patio door configurations, professional installation is genuinely worth the cost. Andersen recommends specific header and sill shims plus a track adapter during LuminAire installation, and the whole system only works correctly if the housing is plumb and the track is perfectly level. If your door frame isn't perfectly square (and a lot of older homes aren't), a DIY install can result in a screen that won't retract smoothly or won't latch properly.
That said, DIY is a reasonable option if you have a compatible door frame in good condition. Andersen's 200 Series and 400 Series gliding patio doors, for example, come with pre-drilled screw holes for the insect screen latch, which simplifies the install considerably. On compatible doors like those, a confident DIYer can handle a manual retractable screen kit in an afternoon. Just note that Andersen specifically says installation is not recommended for discontinued product lines or incompatible door series, so check compatibility before you buy.
| Install Approach | Typical Cost Added | Best Scenario |
|---|---|---|
| Full professional install (standard) | $150 – $400 per opening | Retrofit frames, first-time installs, out-of-square frames |
| Professional install (complex/retrofit) | $300 – $700+ per opening | Non-standard openings, custom framing, multi-panel systems |
| DIY (compatible door, good condition) | $0 labor + time | Compatible new or existing doors with good frames |
| DIY (retrofit with modifications) | Risky — gaps, misalignment likely | Not recommended without carpentry experience |
Bottom line: if your patio door is a standard modern sliding or gliding door from a major brand and the frame is square and clean, DIY is a real option that saves you $150 to $300. If there's any doubt about the frame condition or you're working with a larger or older opening, pay for professional installation. The difference in quote cost is small compared to having a screen that works reliably every day.
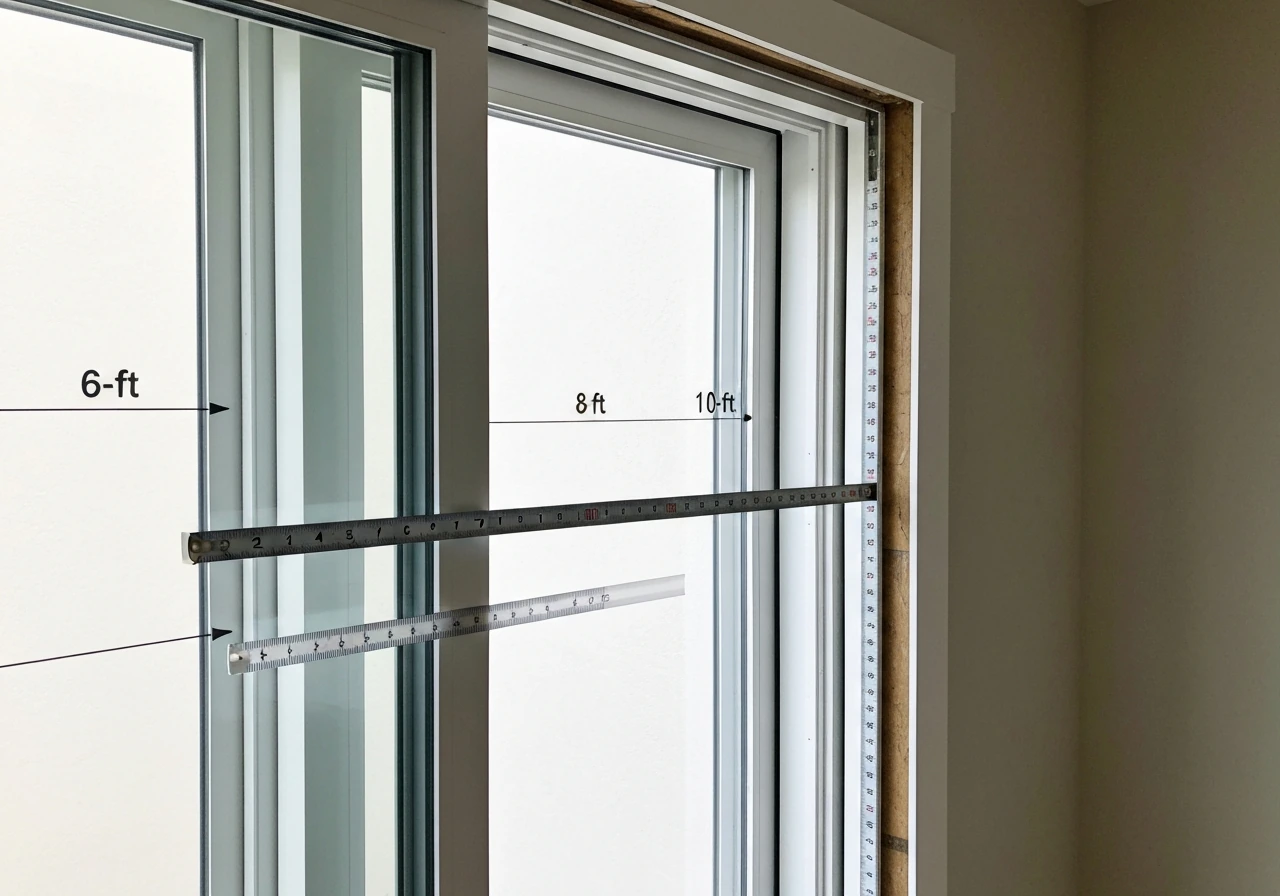
How to measure your patio opening and get accurate quotes
Getting an accurate quote starts with accurate measurements. Most quote errors come from homeowners giving rough estimates or forgetting to account for clearance requirements. Here's exactly how to measure so that any installer or online configurator gives you a real number.
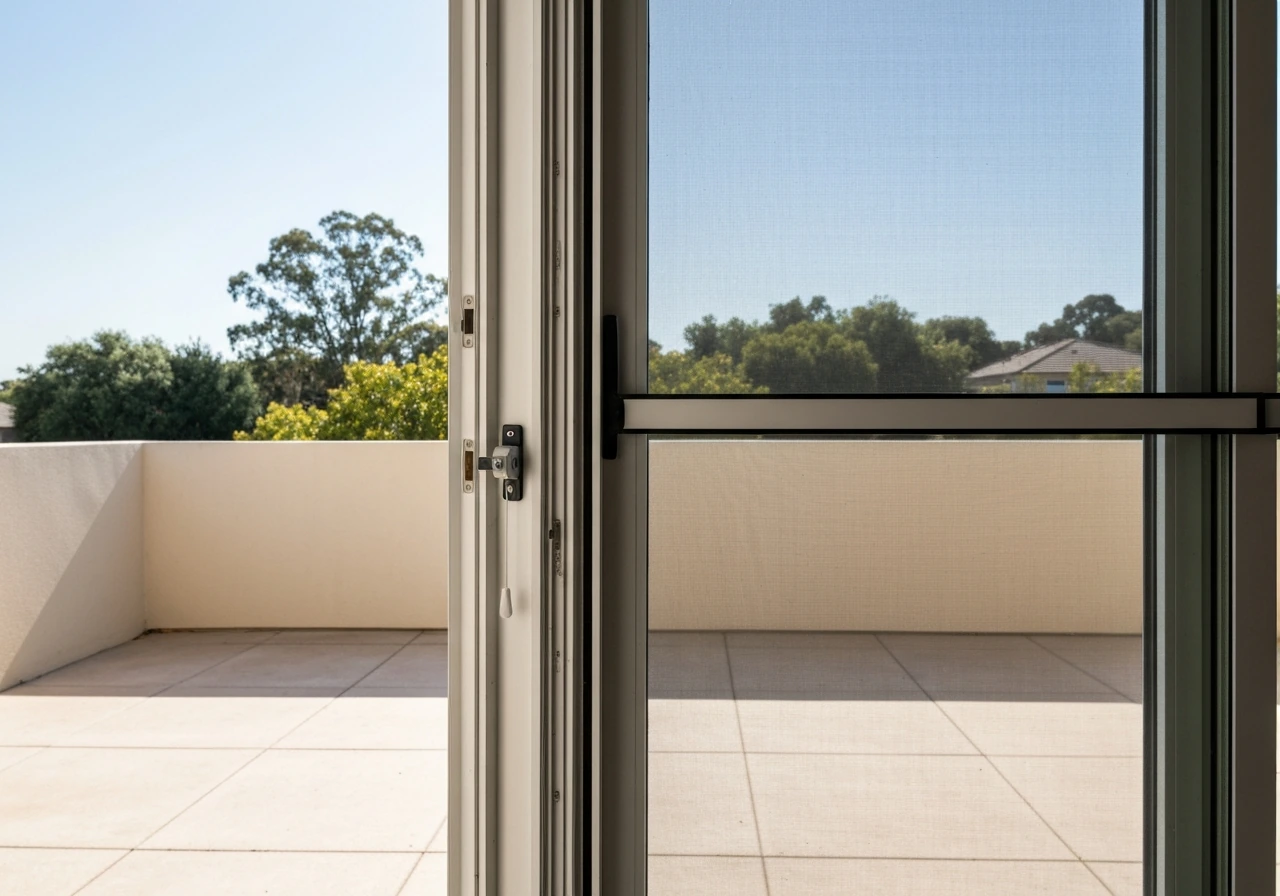
- Decide on inside vs. outside mount first. An inside mount means the screen housing sits inside the door jamb, and you measure the inside dimensions of the opening (inside face of jamb to inside face of jamb). An outside mount means the housing is surface-mounted to the face of the jamb, so you measure the outside face dimensions. This changes your numbers meaningfully, so decide this before measuring.
- Measure width: For a sliding patio door, measure from the inside face of one side jamb to the face of the fixed glass panel frame member. Do this at three points (top, middle, bottom) and use the smallest measurement.
- Measure height: Measure from the bottom of the head jamb down to the top of the sill. Again, take three measurements (left, center, right) and use the smallest.
- Check clearance: You need at least 1 inch of depth clearance on the hinge or housing side for the screen housing itself to sit flush. On the other three sides, you need at least 15/16 inch of clearance for the frame and track. Measure the depth of your jamb at these points to confirm.
- Note the frame condition: Look for warping, paint buildup, or gaps. Any of these should be disclosed to an installer before they quote, because retrofitting around them adds labor cost.
- Write down door brand and series: Many retractable screen systems are designed around specific patio door lines. Knowing your door brand (Andersen, Pella, Milgard, etc.) and series lets installers and online quote tools confirm compatibility before you pay for anything.
Once you have those numbers, you're in a position to get a legitimate quote either from a local installer or directly from a brand's online configurator. Bringing your own measurements to the conversation also signals to installers that you're a serious buyer and usually speeds up the quoting process.
Questions to ask brands and installers before you buy
Not every installer quotes apples-to-apples, and not every brand is upfront about what's included versus what's an add-on. Before you commit to a purchase or sign anything, run through these questions to make sure you're comparing quotes correctly.
- Is this price for the unit only, or does it include installation? (A surprising number of online prices are hardware-only.)
- What track system are you using, and what's the clearance tolerance on the sill track?
- What mesh is included as standard, and what does it cost to upgrade to solar screen or tight-weave insect mesh?
- Does the frame come in my door's color, and is custom color powder coating included or an add-on?
- What warranty comes with this system, and what exactly does it cover? (Ask specifically about the housing, track, and retraction mechanism — not just the mesh.)
- Is this system compatible with my specific patio door brand and series? Do you need the model number to confirm?
- What happens if my frame needs shimming or modification during install? Is that included in the quote or billed separately?
- Have you installed this system on a door like mine before, and can I see photos or references?
- If I go motorized later, is there an upgrade path, or would I need a completely new unit?
- What's your lead time for installation right now, and do you require a deposit?
That last question matters more than people realize. In mid-2026, lead times from some installers and specialty screen brands are running 3 to 6 weeks, especially for custom-width manual systems or any motorized build. If you're trying to get screens installed before peak summer heat, get your quote and measurements sorted now rather than waiting.
Manual vs. motorized: which one is actually worth it for your patio
If your patio has a standard single sliding door and you're mainly trying to keep bugs out and get some airflow, a manual retractable screen is genuinely the right call. A manual retractable patio screen is also a great fit if you want simple operation with fewer moving parts than motorized models. It's simpler, less expensive, easier to repair, and plenty durable if you buy from a reputable brand. Motorized systems earn their cost premium when you have a large opening (8 feet or wider), use the screen multiple times a day, or want it integrated into a smart home setup. For anything smaller than that, the motorized upcharge often doesn't pay back in convenience.
Manual retractable patio screens also tend to have lower long-term maintenance costs since there's no motor to service or electrical connection to troubleshoot. If you are comparing options, manual patio screens are often the best value for single patio door setups with moderate use manual retractable patio screens. The trade-off is that you have to pull and latch the screen yourself, which becomes tedious if you're going in and out constantly. For most households with a single patio door and moderate use, manual wins on value.
Your next steps to get a real price today
Here's the short version of what to do right now if you want to move from browsing to buying. Take your opening measurements using the steps above, note your patio door brand and series, decide whether you want an inside or outside mount, and pick your mesh priority (basic insect screen vs.
Deciding whether you will mount the retractable screen inside the opening or outside the opening is a key measurement step because it changes the dimensions used for the enclosure and track decide whether you want an inside or outside mount. solar/tight-weave).
With those four things settled, you can get accurate quotes from two or three installers or configurators and actually compare them. Budget $300 to $800 for a manual single-door system with professional install, and expect to pay more if your opening is wider than 6 feet or your frame needs any retrofit work.
If you're still deciding between a simple manual screen, a full manual retractable patio awning for shade, or a purpose-built bug screen with tighter mesh weave, those are all distinct products with their own price profiles. A manual retractable patio screen for a door opening is the most cost-efficient starting point for most homeowners, and the measurement and quoting process above applies across all of those categories once you're ready to compare options side by side. In most cases, patio door handles are not fully universal, but compatibility depends on the door brand, handle style, and mounting hardware manual retractable patio screen.
FAQ
Can I install a retractable patio screen over an older patio door frame (retrofit) or does it need a new frame?
Yes, but only if the door system is truly compatible. Many retractable screen kits mount to a specific sill/header profile and require the latch position to line up with pre-drilled points or a compatible adapter. If your patio door brand or series is unknown, ask the installer to confirm compatibility in writing using the door model number, and verify whether the screen is an inside or outside mount for your frame depth.
What measurements matter most, and what clearance mistakes cause quotes to be wrong?
Measure the screen opening clearance so the retractable housing can sit flush without scraping the door or handle hardware. In particular, check how far the door handle protrudes when closed, and confirm there is enough room for the track to sit level on the sill. If you have weatherstripping or a raised threshold, you may need shimming or a specific sill adapter, which can add to labor and material cost.
Does warranty coverage affect the real cost, especially for the track and retraction mechanism?
Insurance and warranty terms usually treat the screen as an exterior accessory, and storm damage claims are often handled differently than standard wear. If you are buying, prioritize a warranty that covers the track and retraction mechanism, not just the mesh. Also ask whether the installer warranty covers labor and adjustment work (for example, track leveling) if the screen jams after installation.
If I choose a tighter bug mesh, what cost and performance trade-offs should I expect?
Tight-weave or high-visibility meshes tend to cost more up front, but the bigger variable is how it affects visibility and airflow trade-offs for your use. If you want the smallest bugs blocked, choose the tighter mesh option and plan for slightly higher material cost and potentially different rolling resistance depending on housing and track quality.
What signs mean a low-quality track, and how do I prevent jamming or uneven retraction?
Look for evidence the track system is designed to handle everyday debris and thermal expansion. Ask whether the track is adjustable or has a cleaning strategy recommended by the manufacturer, and whether the sill channel is engineered to prevent bowing. A good next step is to ask how jamming issues are diagnosed and what replacement parts are covered if the screen retracts unevenly.
Are retractable patio screens more expensive in coastal or humid climates, and what should I spec to avoid corrosion?
If you live in a coastal or very humid area, frame gauge and coating quality matter more than most buyers expect. Ask whether the aluminum is heavier gauge and what coating type is used for salt-air resistance, and consider prioritizing hardware that is corrosion-resistant (latch and endcaps). This can add cost, but it reduces the chance of stiffness or surface corrosion that makes the screen harder to retract over time.
When is motorized actually worth the extra money compared with a manual screen?
Yes, motorized systems can be worth it if you have frequent use, wider openings (often 8 feet or more), or mobility concerns, but they also add electrical and troubleshooting complexity. Ask whether the motorization requires a nearby power source, whether a battery backup option exists, and what the expected service call cost is if the motor or limit switch fails.
How can I reduce the risk of delays, especially for custom-width or motorized systems?
Lead time can change based on custom widths, mesh selections, and whether parts are backordered. To avoid a peak-season scramble, request a confirmed install date when you place the order and ask what happens if the housing arrives but the contractor schedule slips. If timing is tight, prioritize standard-width manual systems with common mesh options first.