A manual patio screen is exactly what it sounds like: a screen door or screen panel you operate by hand, with no motor, no app, and no batteries required. You slide it, swing it, or pull it across your patio door opening to keep bugs out and let air in. They're the most common, most affordable, and most DIY-friendly screening option for patio doors, and when they're fitted and adjusted correctly, they work incredibly well.
Manual Patio Screens Guide: Choose, Measure, Install, Maintain

Owen Delaney
27 May 2026
What manual patio screens are and how they actually work
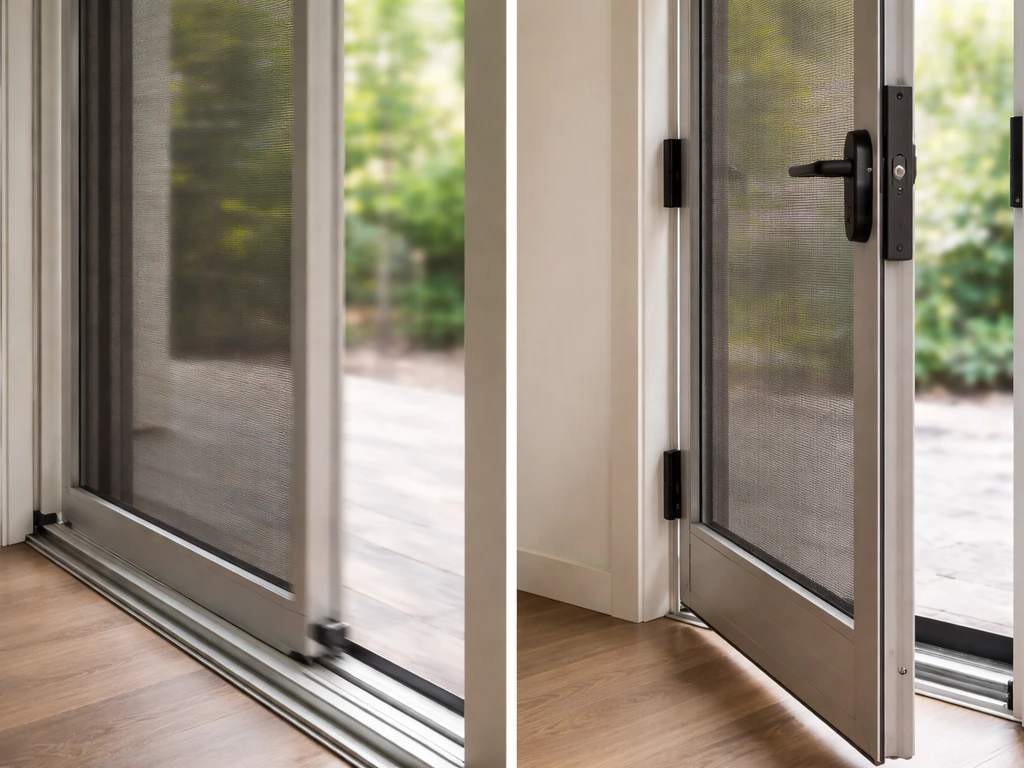
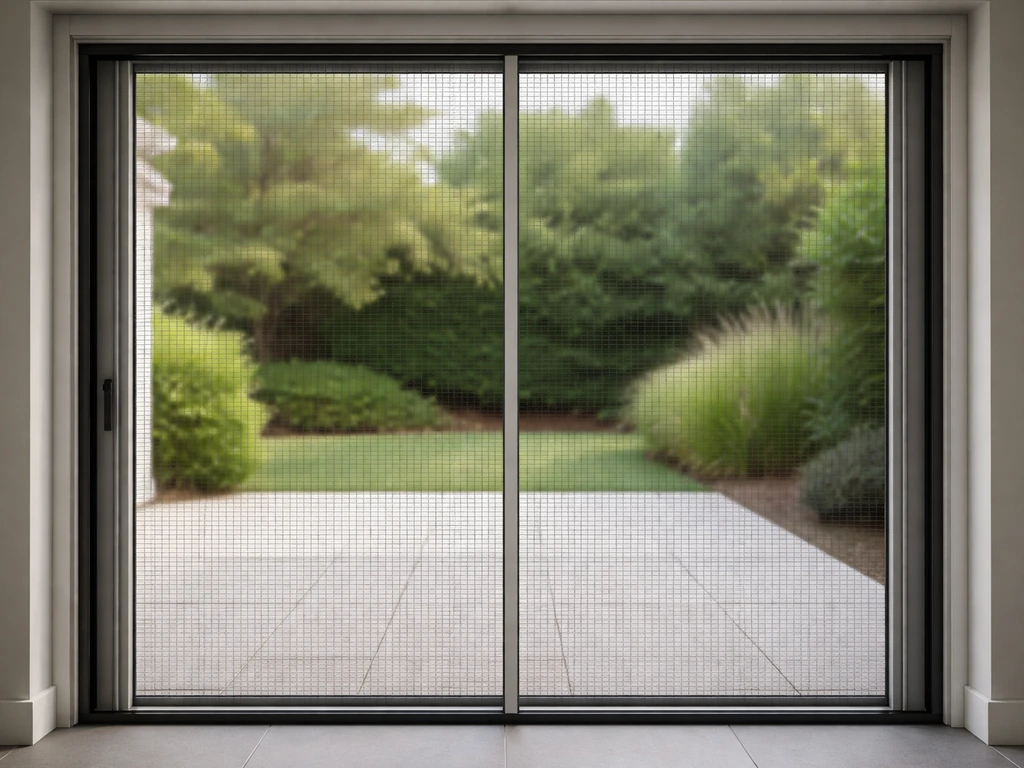
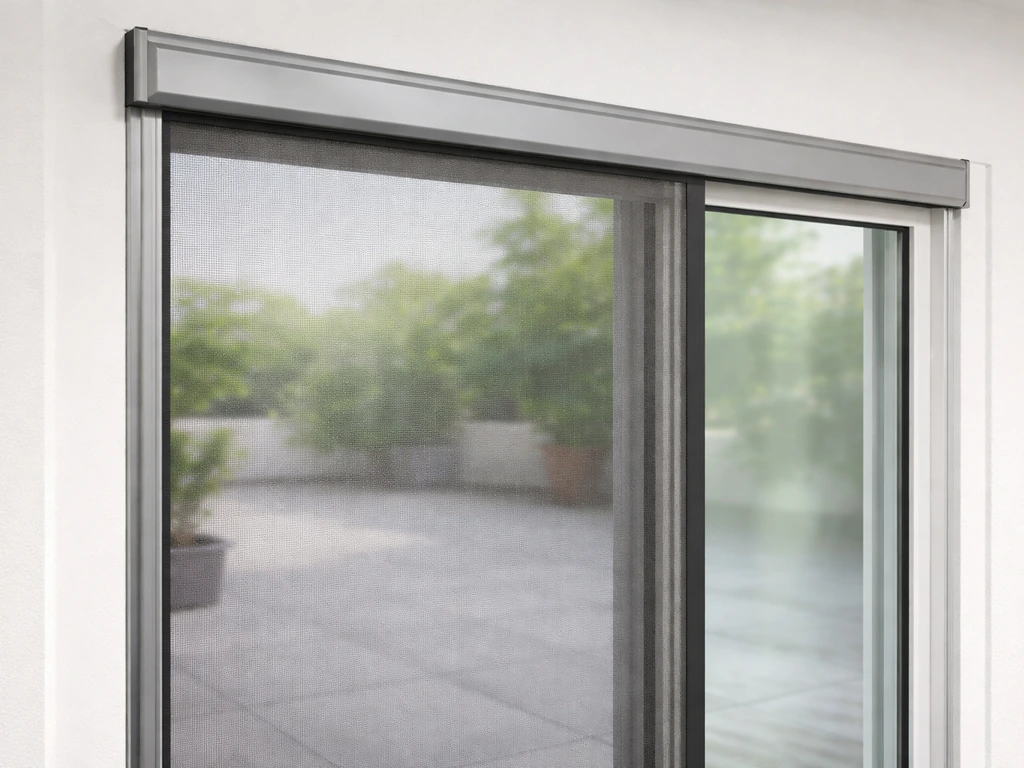
Most manual patio screens fall into one of two operating styles. Sliding screens ride on a set of top and bottom rollers that run inside a track channel built into your patio door frame. You push or pull the screen panel horizontally to open or close it. Hinged or swing-style screens are mounted on side hinges and open outward like a regular door, then latch shut. There are also manual retractable screens that roll into a housing when not in use, but those are a separate product category with their own hardware considerations.
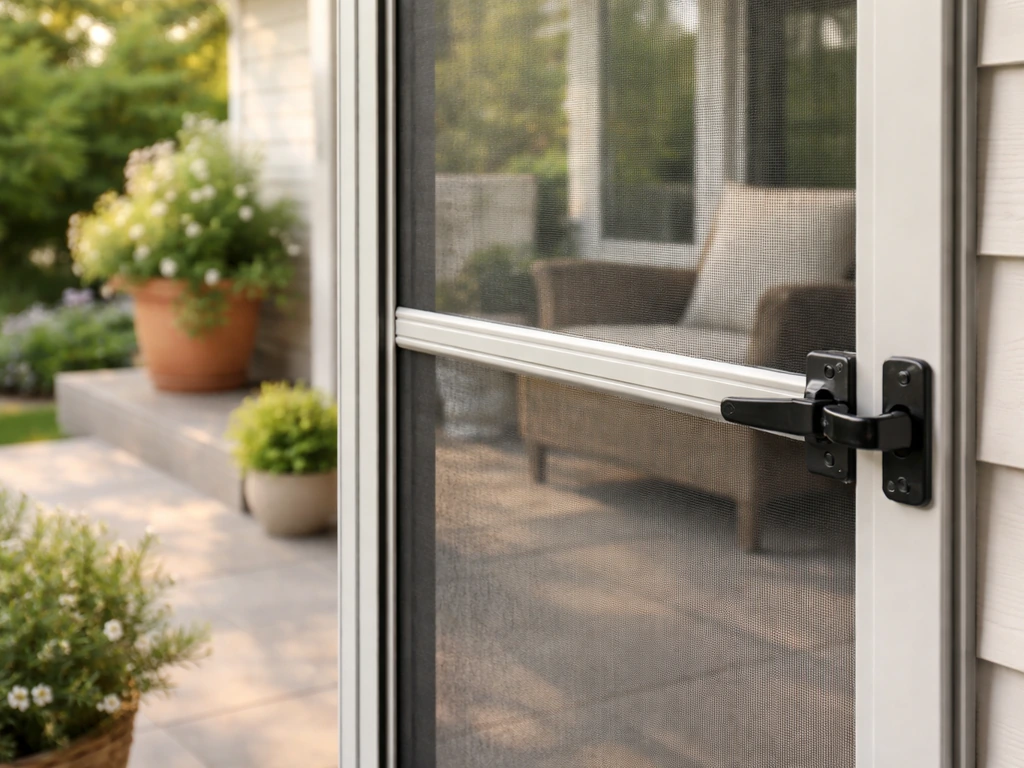
The sliding style is by far the most popular for patio doors. A typical sliding screen has two or four plastic or nylon rollers (top and bottom), a handle, and a latch mechanism that locks the screen against the door frame or strike plate when closed. Patio door handles are not all the same, so it helps to confirm whether your handle style is universal before you order a replacement a handle, and a latch mechanism.
The rollers sit in a U-shaped track channel. Most systems include adjustment screws on the rollers that let you raise or lower the screen slightly to get it running smoothly without binding. Brands like Heartland, USALUM, Viwinco, and Milgard all use slight variations of this same roller-and-track design, so once you understand one, you understand them all.
Picking the right type for your specific patio door
The type of manual screen you need is driven almost entirely by your patio door style. Match the screen to how your door operates, not just how big the opening is.
| Patio Door Type | Best Manual Screen Match | Key Considerations |
|---|---|---|
| Single sliding patio door | Single sliding screen panel | Needs to match door frame track dimensions; most common replacement screens available |
| Double sliding (two-panel) patio door | Full-width sliding screen or two-panel screen | Check whether track spans full width or only one side |
| French door (hinged, outswing) | Hinged screen door (outswing) | Needs side clearance; screen must swing same direction as door or opposite depending on layout |
| French door (hinged, inswing) | Hinged screen door (inswing) or surface-mount magnetic screen | Inswing screens are less common; measure clearance carefully |
| Bifold patio door | Retractable or pleated screen system | Standard sliding screens don't work here; manual retractable is the practical option |
| Fixed panel + sliding door combo | Single sliding screen for the sliding side | Screen only covers the operable panel, not the fixed side |
If you have a standard single or double sliding patio door, a replacement sliding screen panel is straightforward to source and install yourself. If you have French doors, you're looking at a hinged screen door for each panel, which typically requires a closer or magnetic latch to keep the screen from swinging open in a breeze. Bifold doors are the trickiest because the folding panels eliminate the possibility of a standard sliding screen track.
How to measure so your screen actually fits
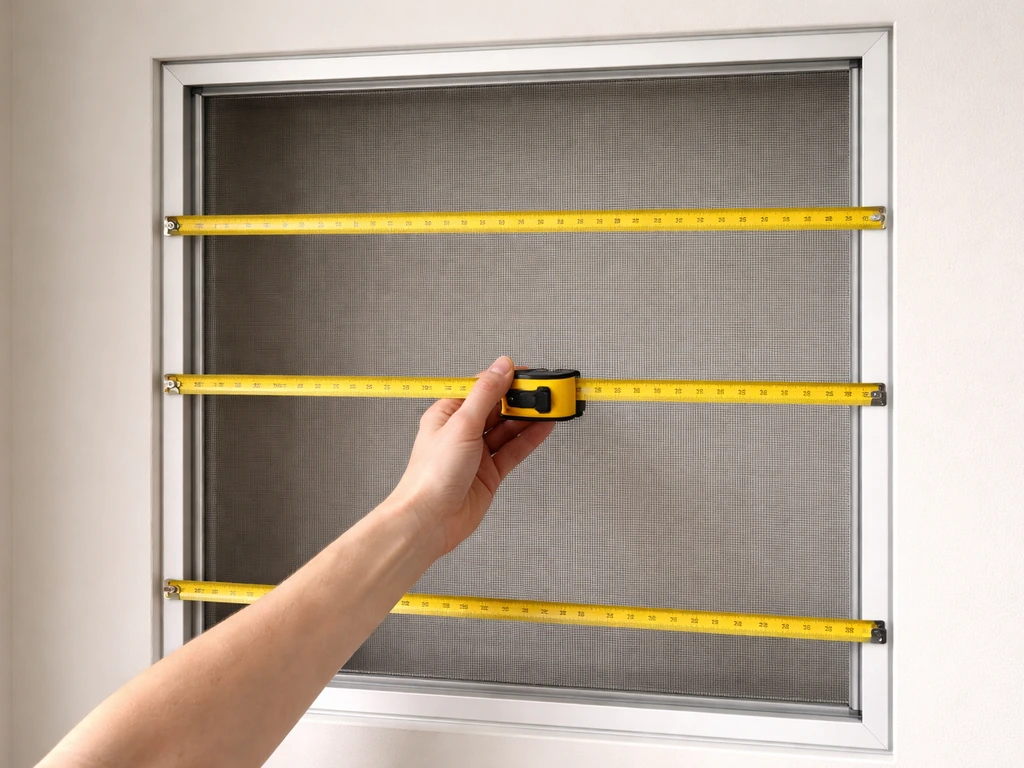
Wrong measurements are the single biggest reason DIY screen installs fail. Measure the screen opening, not just the door frame. For a sliding screen, that means measuring the track-to-track dimensions, not the rough opening in your wall.
Width measurement
Measure the width at three points: top, middle, and bottom of the screen opening. If the numbers differ (they often do in older homes where frames have settled), use the smallest measurement as your final width. The screen needs to overlap the door frame on one side and the center mullion or door edge on the other to create a proper seal. That overlap is what keeps bugs from sneaking in at the edges.
Height measurement
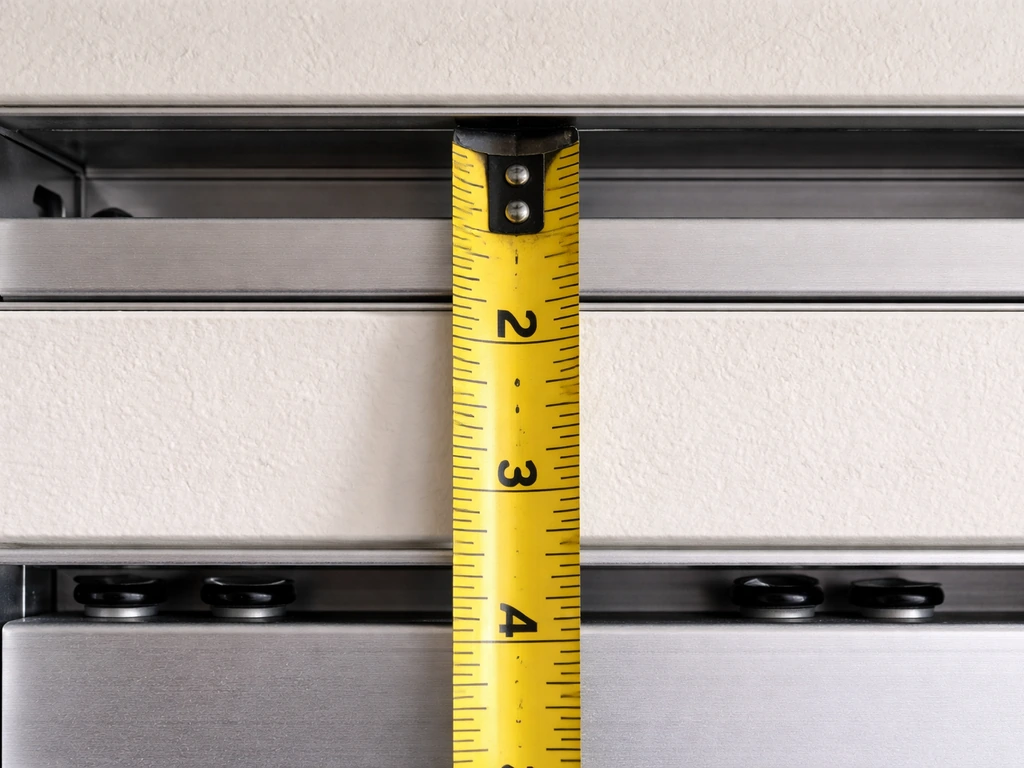
Height is where people most often make mistakes. Don't just measure the visible opening. Measure from the top of the bottom roller track up to the top of the upper U-channel (the groove the screen slides into at the top). The screen panel itself needs to fit inside that channel with a small amount of clearance, not just span the opening gap. Apex, Avenue Glass and Screen, and several other suppliers all spell this out in their measurement guides. If your screen is too tall, it won't drop into the bottom track. If it's too short, it'll fall out of the top channel.
Some DIY-friendly products like RiteScreen's adjustable sliding door screen are built to handle a range of heights (for example, fitting a 78" to 81" height range) using a self-adjusting fit system. These are great if your opening is within their stated range and you want some flexibility. If your opening falls outside standard ranges, you'll likely need to order a custom-cut screen.
Clearance and depth
One measurement people skip is depth clearance, especially for hinged screen doors. You need at least 1 inch of clearance on the hinged side so the door can swing and the hinge hardware can seat properly. If your existing door frame or threshold is uneven or damaged, the screen won't run smoothly no matter how perfectly you measure the opening. Check that the track surface is continuous and level before you order anything.
Mesh types, frame materials, and what holds up in your climate
The mesh you choose affects how well bugs are blocked, how much airflow you get, how long the screen lasts, and how visible it is from inside the house. Here's how the main options compare:
| Mesh Type | Common Weave | Best For | Durability | Airflow/Visibility |
|---|---|---|---|---|
| Standard fiberglass | 18x16 | Most climates, everyday use | Good (10+ years) | Excellent |
| Aluminum mesh | 18x16 or 20x20 | High-UV climates, durability priority | Very good, but dents | Good |
| Fine/midge mesh | 30x20 or 20x20 | Coastal areas, gnats, no-see-ums | Similar to standard | Slightly reduced |
| Pet-resistant fiberglass | Extra heavy-duty weave | Homes with cats or dogs | Excellent tear resistance | Good |
| Solar/privacy mesh | Varies | Sun control + screening | Good | Reduced outward view |
Standard 18x16 fiberglass mesh is the right choice for most homeowners. It balances airflow, visibility, and insect protection well, and fiberglass won't crease or dent if you bump into it. Aluminum mesh is stiffer and more durable against physical wear, but it dents permanently and can oxidize in salt-air coastal environments. If you're dealing with tiny insects like gnats or no-see-ums, look for a finer 20x20 or 30x20 mesh. The smaller openings block those insects without dramatically cutting airflow. If you have pets that scratch or push on the screen, Climaloc and a few other brands make extra-heavy-duty fiberglass mesh that's significantly harder to puncture than standard screen fabric.
For the frame itself, aluminum frames are the standard choice. They're lightweight, don't rust, and are compatible with virtually every patio door track system. Vinyl-wrapped frames are available in white or brown for a cleaner look against specific door finishes, but they're slightly less rigid. In hot climates with intense UV exposure, look for frames with a powder-coat finish rather than painted aluminum, as paint fades and chalks faster.
Installing your manual patio screen: DIY vs. hiring out
Most sliding screen door installations are well within DIY territory if you're comfortable using a screwdriver and measuring tape. The basic process goes like this: tilt the top of the screen panel into the upper track channel, then lower the bottom rollers onto the bottom track. Some systems include plastic guide clips you snap into the top channel to help hold the screen in place while you seat the bottom. After that, you adjust the roller height screws so the screen slides smoothly without binding or dragging, and then set the latch alignment. Total time for a straightforward replacement is usually 30 to 60 minutes.
The important prep step most people skip: clean the sill track and head channel before installing. Dirt, debris, and dried lubricant buildup in the tracks is one of the top reasons screens bind immediately after installation. Once the screen is seated, use a silicone-based spray lubricant on the sill roller track. Don't use WD-40 or oil-based products. They attract dirt and gum up the track over time.
When to hire a professional
Hire a pro if your door frame is warped or out of square, if your existing track is damaged and needs replacement, or if you're installing a hinged screen door on a frame that needs new hardware and isn't prepped for it. Professionals also make sense if you're buying a higher-end custom screen and want the fit guaranteed. Labor and installation for a sliding screen door typically runs between $120 and $260 for a straightforward job, though complex setups or track repairs can push costs higher.
Security, privacy, and weather sealing: what to look for
A basic patio screen latch is really just meant to keep the screen closed in calm conditions. It's not a security device. Most use a simple lever-style latch that engages a strike plate on the door frame. Heartland, USALUM, and similar systems use this style. For the latch to work correctly, the lever must be oriented toward the interior (so it can engage the frame from inside), and the strike plate position needs to match the latch height after roller adjustment. If your latch isn't catching, the fix is usually roller height adjustment, not a new screen.
If security is a real concern, you can upgrade to purpose-built sliding screen door locks. Yale's Quattro sliding security screen door lock is a dedicated security product designed specifically for this use case. Apex sells sliding screen door strike hardware that provides a more robust locking point than a standard latch. These upgrades are relatively inexpensive and can be retrofitted to most existing screen frames.
For weather sealing, look for screens with pile weatherstripping along the sides. This is a thin brush-like seal that runs vertically on the edges of the screen panel and closes the gap between the screen and the door frame. Without it, you'll get insect infiltration through the sides even when the screen is closed. In windy or stormy climates, also check that the screen's bottom sweep or brush seal is in good condition, as this is where debris and small insects most commonly get through.
Keeping your screen running smoothly: maintenance and common fixes
Manual screens are low maintenance, but they do need occasional attention. A few basic habits will keep them working for years.
Regular cleaning
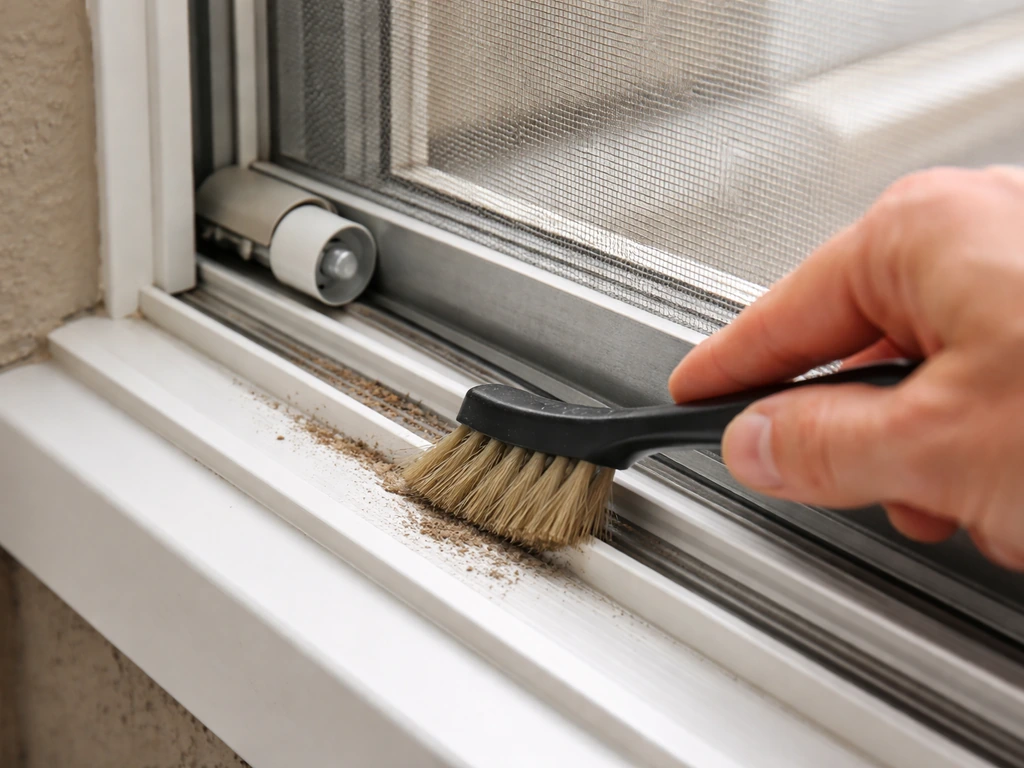
Clean the sill track two to three times a year with a stiff brush or vacuum, then wipe it down with a damp cloth. Dirt, pet hair, and grit in the track are the main causes of sticking and binding. While you're at it, wipe down the screen mesh with a soft brush or hose it down gently to clear debris that reduces airflow.
Troubleshooting common problems
- Screen sticks or drags: Clean the track first, then apply silicone spray lubricant to the bottom track. If it still sticks, access the roller adjustment screws (usually hidden under a small plug on the bottom frame rail) and adjust the roller height. Raising or lowering a roller by even 1/16" can fix a binding issue.
- Screen falls off track: The rollers are probably set too low. Raise the bottom rollers so they have firm contact with the track groove. If the screen is also slipping out of the top channel, check whether the top guide clips are present and seated correctly.
- Latch doesn't catch: This almost always means the screen isn't at the right height relative to the strike plate. Adjust the rollers up or down until the latch lever aligns with the strike, then test. Milgard's support documentation notes that lock engagement issues are usually a roller alignment problem, not a broken latch.
- Gap along the edge or bottom: Check the pile weatherstripping. If it's compressed flat, worn, or missing, replace it. Pile weatherstrip is sold by the roll at most hardware stores and you can press it into the frame groove without tools.
- Damaged or torn mesh: Re-screening a patio screen frame is a DIY job. Pull out the old spline (the rubber cord that holds the mesh in the groove), cut new mesh to overlap the frame by at least an inch on each side, and roll the spline back into the groove using a screen rolling tool. Kits from RiteScreen and Climaloc include the spline and roller tool.
What you'll spend and what to expect at different price points
Manual patio screens cover a wide price range depending on whether you're buying a DIY replacement panel, a fully assembled custom screen, or having one professionally installed. Here's a realistic breakdown.
| Option | Typical Cost | What You Get |
|---|---|---|
| DIY adjustable sliding screen (standard mesh) | Starting around $175–$195 | Self-adjusting fit, basic latch, aluminum frame, standard fiberglass mesh |
| Fully assembled custom sliding screen | Starting around $290–$350+ | Exact sizing, optional mesh upgrade, assembled and ready to install |
| PetScreen or specialty mesh upgrade | $290–$400+ assembled | Heavy-duty or fine mesh, same frame hardware |
| Professional installation (labor only) | $120–$260 typical, up to $700 complex | Includes fit adjustment, latch alignment, track cleaning prep |
| Full replacement with installation (unit + labor) | $350–$900 average range | Covers standard sliding screen door replacement projects |
At the lower end, a DIY adjustable screen in the $175 to $195 range gets the job done for a standard opening. If your door is an odd size or you want a pet-resistant or fine-mesh upgrade, expect to pay $290 and up for a fully assembled panel. The jump in price from DIY to professional installation is mostly labor, and for a straightforward swap it's completely reasonable to do it yourself in under an hour. Spend the extra money on a better mesh grade rather than on installation if your opening is a standard size.
One thing worth knowing: manual retractable patio screens sit in a higher price bracket than standard sliding screens because of the housing and coil mechanism, but they offer a cleaner look when not in use. Manual retractable patio screens add a housing and coil mechanism that keeps the screen neatly out of the way when not in use. If you're comparing the two, the manual sliding screen wins on cost and simplicity.
If budget allows and aesthetics matter, a manual retractable version is a genuine upgrade worth exploring. Similarly, if insects are your main concern rather than sun or weather control, a bug-specific retractable screen rated for your specific pest environment may be worth the added cost over a standard sliding screen panel.
If you're wondering how much retractable patio screens cost, pricing depends on the size, the mesh type, and whether you need custom hardware for your door opening bug-specific retractable screen.
To get started today: measure your opening using the track-to-channel method described above, identify whether you have a sliding, French, or bifold door, pick your mesh type based on your biggest concern (standard bugs, pets, or tiny insects), and decide if your frame is in good enough shape to DIY. If the tracks are clean and the frame is square, a DIY adjustable panel from RiteScreen or a similar brand will have you bug-free this weekend.
FAQ
Can I buy a manual patio screen from a different brand and use it on my existing track system?
Typically not. Most sliding manual patio screens need the roller-and-track system to fit the specific top and bottom channel geometry, roller type, and latch alignment of your door frame. If you mix brands, the screen panel height and roller spacing may not match, which can cause binding or the latch to miss the strike plate.
What measurement mistakes most often lead to a manual patio screen that won’t fit?
No, you should not size by the rough opening in the wall. For sliding screens, you need the track-to-track dimensions, and you should verify width at top, middle, and bottom. For height, use the distance from the top of the bottom track to the top of the upper top channel, not the visible gap.
What happens if my manual patio screen is slightly too tall or too short?
If the screen is too tall, the bottom rollers may not drop into the lower track, and you can also end up rubbing the upper channel. If it is too short, it can pull out of the top channel or leave an inconsistent overlap that lets insects through. The fix is usually ordering the correct height or using a product with an adjustment range that matches your opening.
My manual patio screen slides but feels rough, what should I check first?
You should feel for light, smooth movement by hand before relying on the latch. If it drags, the usual causes are track debris, incorrect roller height adjustment, or an uneven threshold that changes track level. After cleaning, adjust roller height screws a small amount at a time until it rolls without binding.
If my latch doesn’t catch after installing a manual patio screen, do I need a new screen?
Yes, but only if the new hardware matches your existing frame and latch strike location. A common issue is installing the correct screen panel but not the correct latch and strike alignment, which prevents full engagement. When replacing the screen, verify both the latch type and where the strike plate lands after you adjust roller height.
Can I convert a standard sliding manual patio screen to a manual retractable system?
Not usually. Manual retractable systems have a different enclosure and pull/coil hardware than standard sliding panels, so a regular sliding screen panel generally cannot drop into a retractable housing. If you are upgrading from non-retractable to retractable, confirm the housing kit is designed for your door opening and track shape.
Do hinged manual patio screens require different clearances than sliding ones?
For hinged or swing-style screens, you need sufficient hinged-side clearance so the hinge hardware can sit and the door can swing without rubbing the frame. If your threshold is uneven or the frame is out of square, the swing door can bind even with perfect measurements, in that case professional leveling or hardware changes may be required.
Can I use WD-40 to lubricate the tracks on my manual patio screen?
If you lubricate and still get sticking, the likely culprit is incorrect lubricant type or contaminated tracks. Avoid oil-based products and WD-40 because they can attract grit and turn into a gummy coating. Clean thoroughly, then use a silicone-based spray designed for door tracks and rollers.
Are standard manual patio screen latches enough for home security?
A basic latch is meant for keeping the screen closed, not for stopping forced entry. If you need stronger protection, add a purpose-built sliding security lock or a sturdier strike hardware upgrade designed for screen doors, and make sure it engages firmly into the frame, not just the thin screen frame.
Where should I look if bugs are getting in around my closed manual patio screen?
Yes, weatherstripping matters at the sides and bottom. If the pile weatherstrip is missing or worn, you can get insect entry even when the screen looks fully closed, and a damaged bottom sweep often becomes the main leak point during windy conditions. Replace worn edge seals rather than just tightening the screen.
When is it better to hire a pro instead of installing a manual patio screen myself?
For DIY, it helps to confirm the door frame is square and the track surface is level, because roller adjustment cannot compensate for a warped frame. If the existing track is damaged and needs replacement, or if you are adding a hinged screen to a frame not prepared for hinge hardware, a pro install is usually the lowest-risk path.